Invoicing in Ressio streamlines your billing process so you can create clear, professional invoices in just a few minutes. Invoices can be generated directly from the financial data already stored in your project estimate or budget, or created manually when needed. It gives you flexibility while keeping everything organized in one place.
You can generate invoices from:
- Approved changes
- Budget actuals
- Completion percentage
In this article, you’ll learn how to create new invoices manually, project financial data, release an invoice to your customer, void and mark an invoice paid.
Benefits:
- Save time by generating invoices from existing project data
- Improve accuracy with financials automatically linked to the project
- Increase transparency for both your team and your clients
- Maintain consistency across all projects and billing types
- Track payments easily from creation through completion
- Add multiple sections (progress billing, change orders, or additional items) to a single invoice.
Table of Contents:
- Navigation the Invoices Page and Budget Page
- Creating a Manual Invoice
- Releasing Invoices to Clients
- Track and Mark Payments
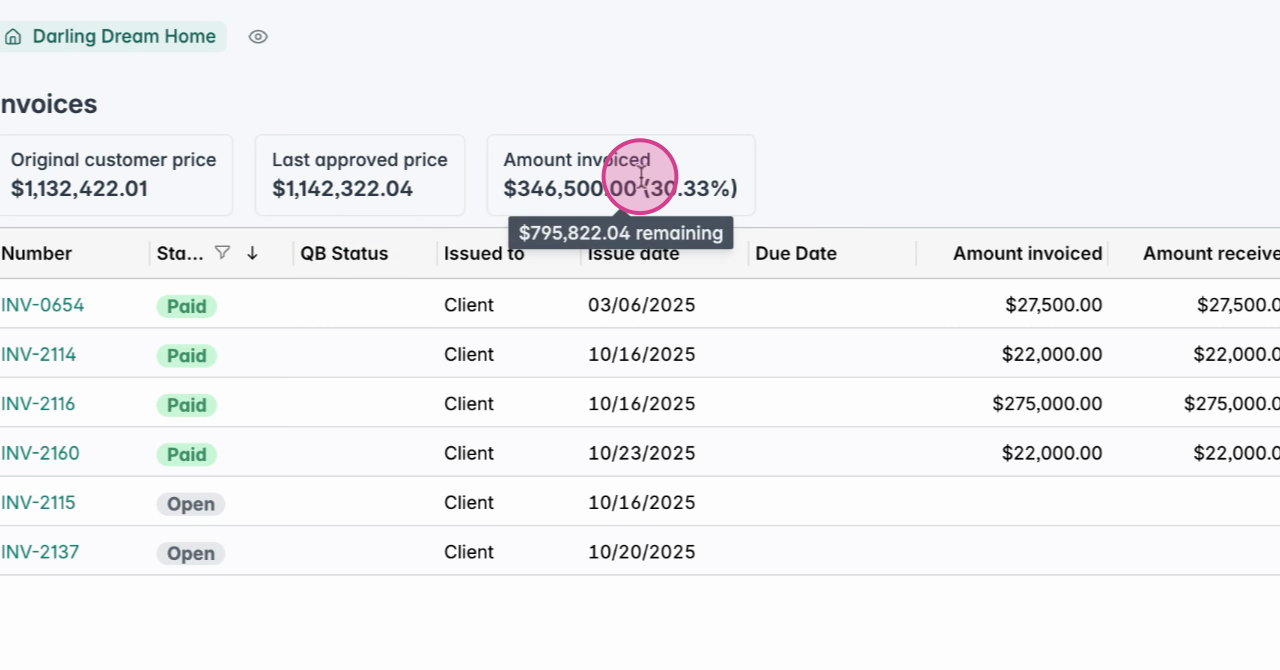
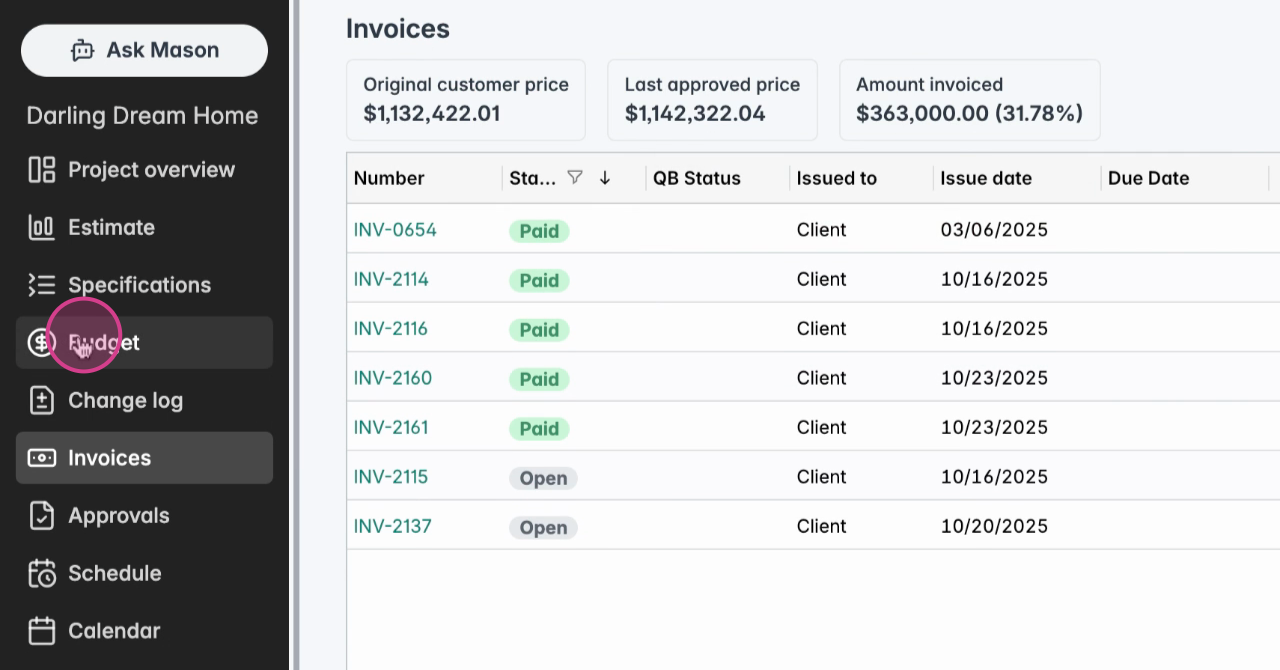
Start by navigating to the Invoices page. This is where you can create a new or "manual" invoice. You and your clients have access to the project invoices providing key information including amounts and due dates Additionally, you can track which invoices have been paid and view the total invoiced amounts and the outstanding balance for the project.

Budget Page

Creating a Manual Invoice
To get started creating any invoice, you can either create from the Invoices Page or the Budget page.
To create a manual invoice:
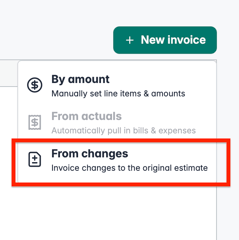
- Select 'New Invoice' in the top right corner
- Select 'By Amount'

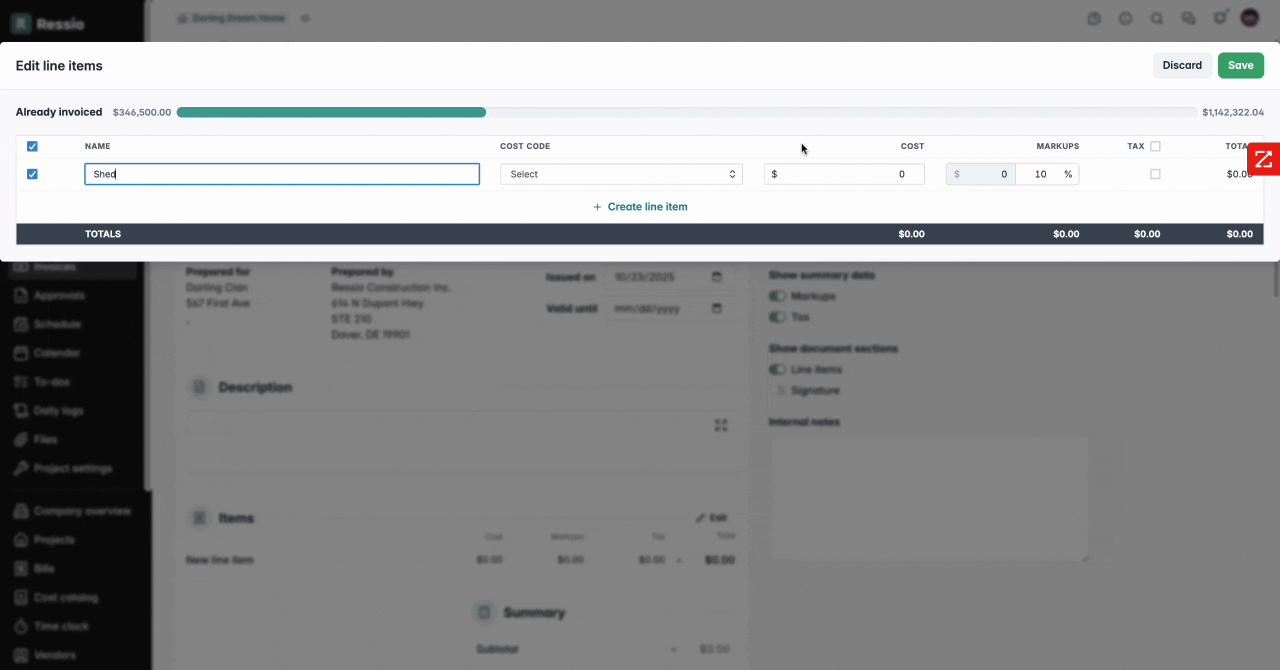
3. Add any necessary items, cost, markups and check on/off the tax, then hit 'Save'.
🚨 Feature Callout: You can now add multiple sections (progress billing, change orders, or additional items) to a single invoice no matter if it is a fixed price or cost plus project.

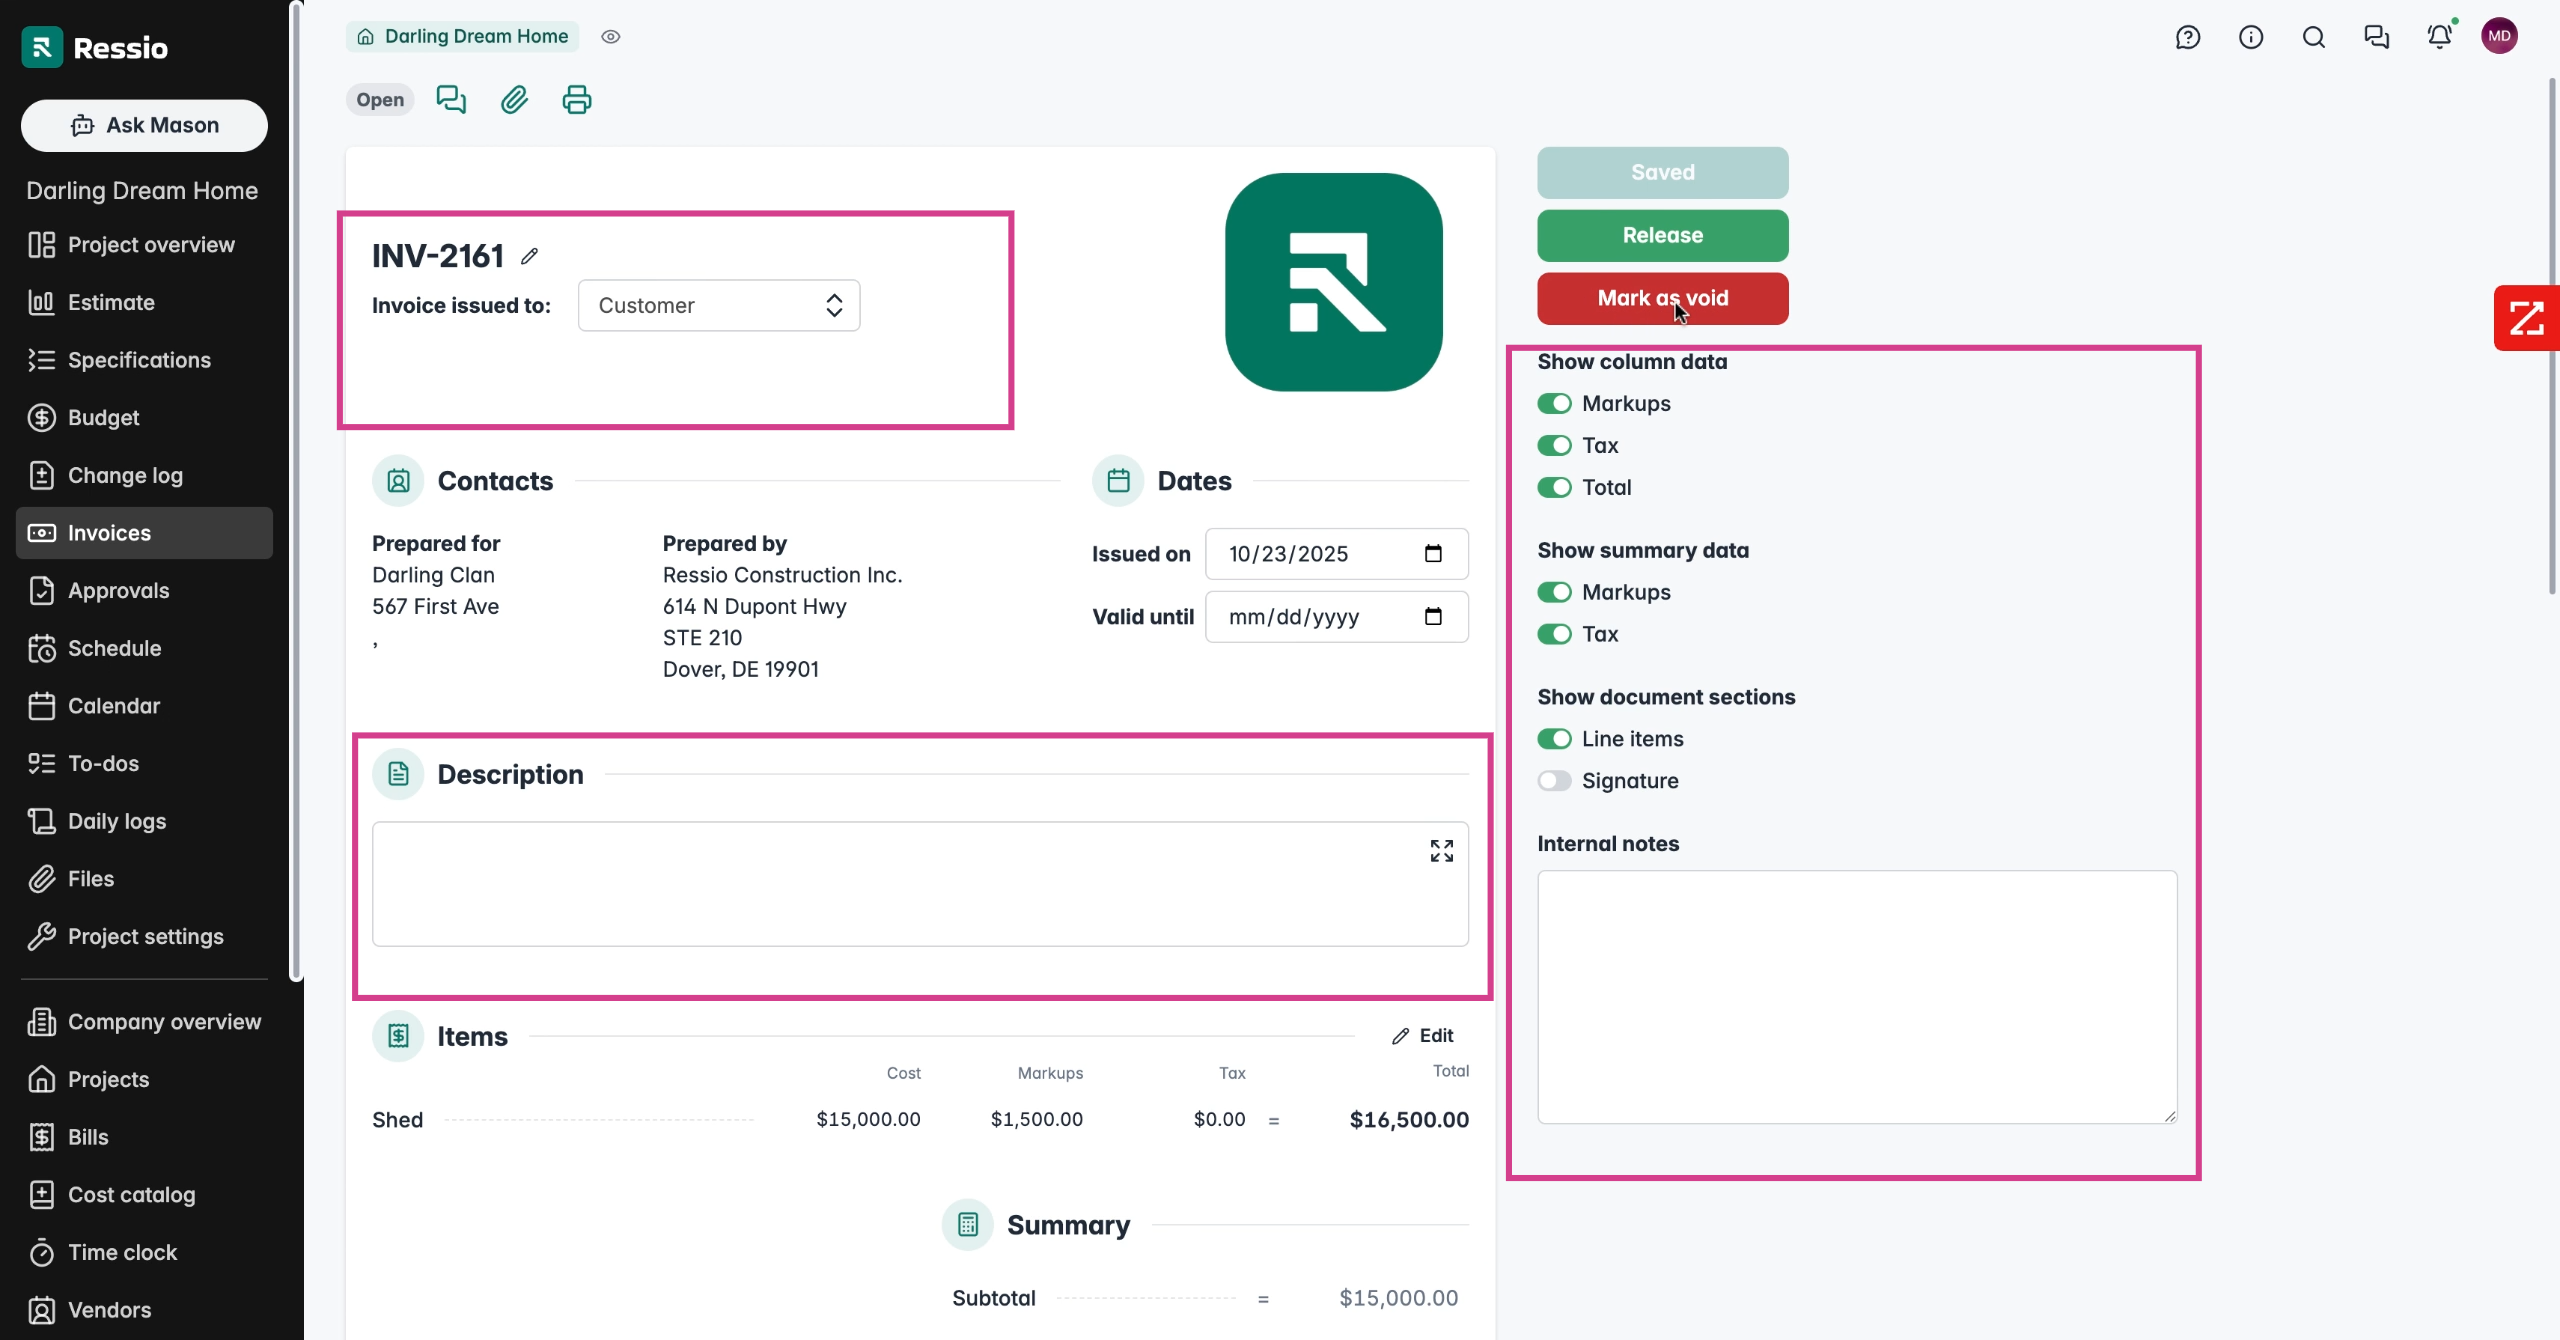
The invoice will be generated. Fill out all the necessary information:
- Title
- Toggle on/off visibility data
- Description
- Check Items
- Terms and conditions
- Attach any necessary files
If you added multiple sections, it will be organized by section.

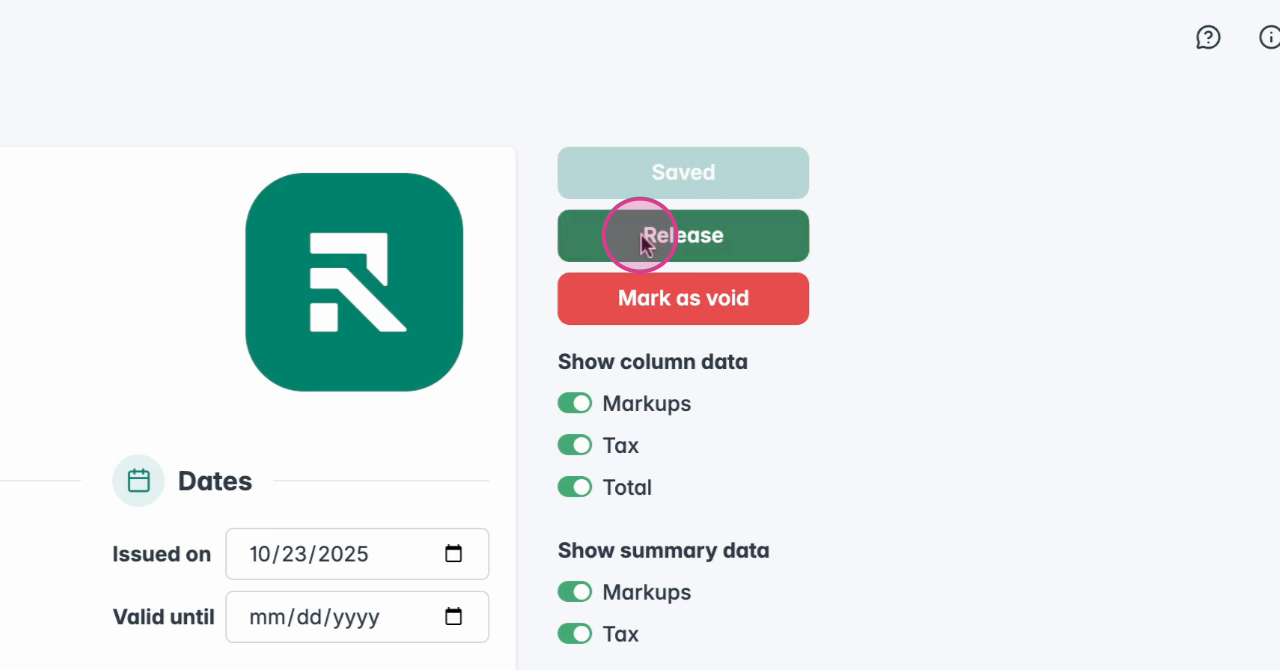
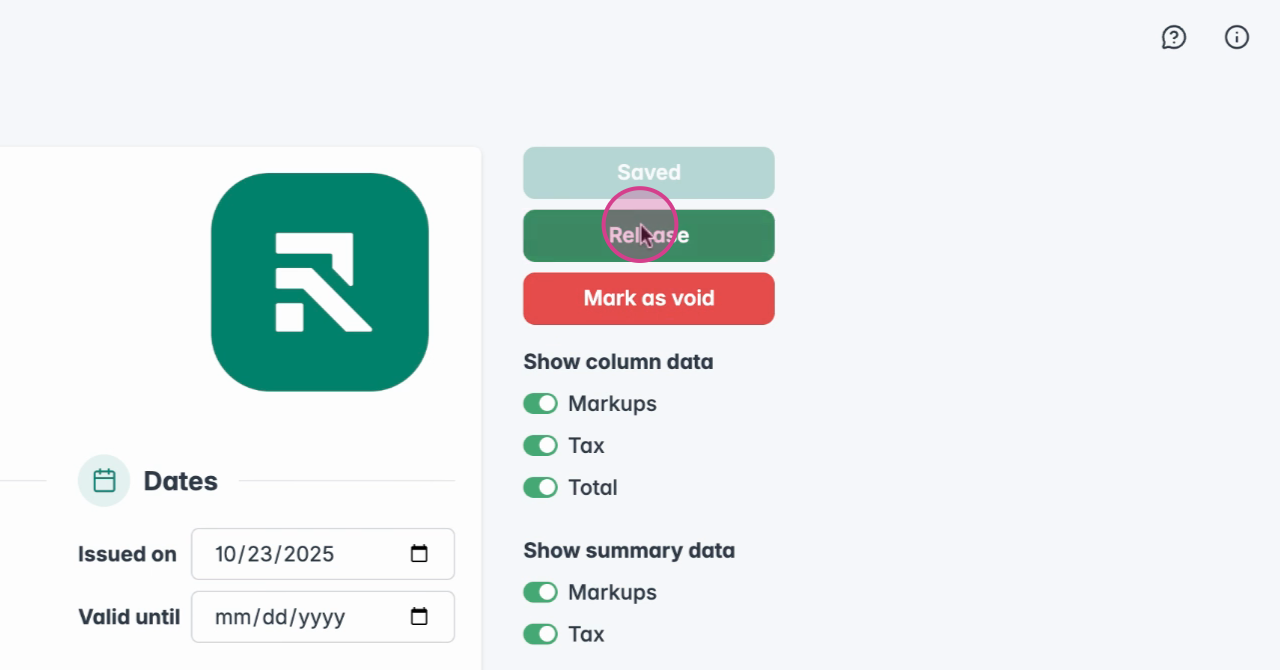
4. Sit 'Save' and 'Release'
Attaching Files to Invoices
Underneath 'Terms and conditions' is where you can attach 'Files'. You can upload files from:
- Your device
- Dropbox
- Google Drive
- OneDrive
- Box
- Company Cam
- Ressio

After attached a file make sure to decide on visibility. You can make it visible to customers or keep it internal.
• If a file is marked public, you’ll be able to see or download it in your customer portal.• If a file is marked private, it stays internal to our team and is not visible to customers.
Creating an Invoice from Changes
Creating an invoice from approved changes is a quick and efficient way to bill your customer for modifications made after the original contract was set. ✅ Tips & Best Practices
- Always confirm that all changes are approved before invoicing.
- Use the View Summary button on the Budget page to confirm totals after invoicing.
- Navigate to the Invoice or Budget Page.
- In the top right hand corner, click '+ New invoice'
- From the available options, select From Changes. This tells Ressio that you’d like to invoice based on invoice changes to the original estimate.
4. A list of approved change orders will appear.
5. Check the box next to each change you’d like to include in the invoice.
✨To enhance your invoice:
-
Select Add from changes to include change orders—positive or negative.
-
Select Add additional items for items like deposits or one-off fees.
This approach allows adjustments for credits or additional charges without generating separate invoices or manual refunds.
proceeding.

💡 Creating an Invoice from Changes on the Budget Page:
This is perfect when you’re already reviewing project totals — it lets you bill changes immediately without switching screens.
Time Entry Costs in Budget Actuals
Whenever time entries are approved, they can be included in the 'Applied Actuals' column in your budget. Time entry cost in budget actuals is enabled by default under the 'Financials' tab in the 'Project Settings'.

🎓 To learn more about about "Including time entry cost in budget actuals", read/watch "Tracking Labor Actuals in the Budget".
Invoicing from Budget Actuals
For cost-plus or open book projects, you can invoice from the actual costs that are already in your budget. When ready to create a new invoice, you’re just a couple clicks away from grabbing your current costs and bringing them into an itemized invoice.
🎗️ This invoicing option only exists for jobs with the cost structure cost-plus / open book jobs and a budget structure set to Cost Codes.
- Click '+ New invoice' from the 'Budget page' or the 'Invoices page'
- Edit any of the cost item invoice details in the the edit pop-up (amount, markup, tax, etc) and click 'Save'
- Edit any of the invoice document fields either directly on the invoice document or using the document editor on the right-side of the screen
- Click 'Save' and then click 'Release'

To further customize before releasing:
-
Add non-expense items such as project management fees using Add additional items.
-
Ideal for hybrid billing models where project management or coordination fees bill separately from expense items.


Invoicing on Project Progress (Completion Percentage)
For fixed price projects, you can progress invoice a percentage of your estimate/budget. You can simply enter a percentage complete for each cost item and Ressio will calculate the correct invoice amount.

- Click '+New invoice' from the 'Budget page' or the 'Invoices page' and select 'By percentage'
- Edit any of the cost item invoice details in the the edit pop-up (% complete by item, etc) and click 'Save'
- Edit any of the invoice document fields either directly on the invoice document or using the document editor on the right-side of the screen
- Click 'Save' and the click 'Release'
🎓 To learn about the difference between fixed price and cost-plus projects, read Understanding Fixed Price vs Cost Plus Contracts.
Cost Plus Invoice Toggles
For cost plus projects, invoice row data toggles allow you to display vendors, employees, and shift descriptions, providing more detailed information to clients.

Releasing Invoices to Clients
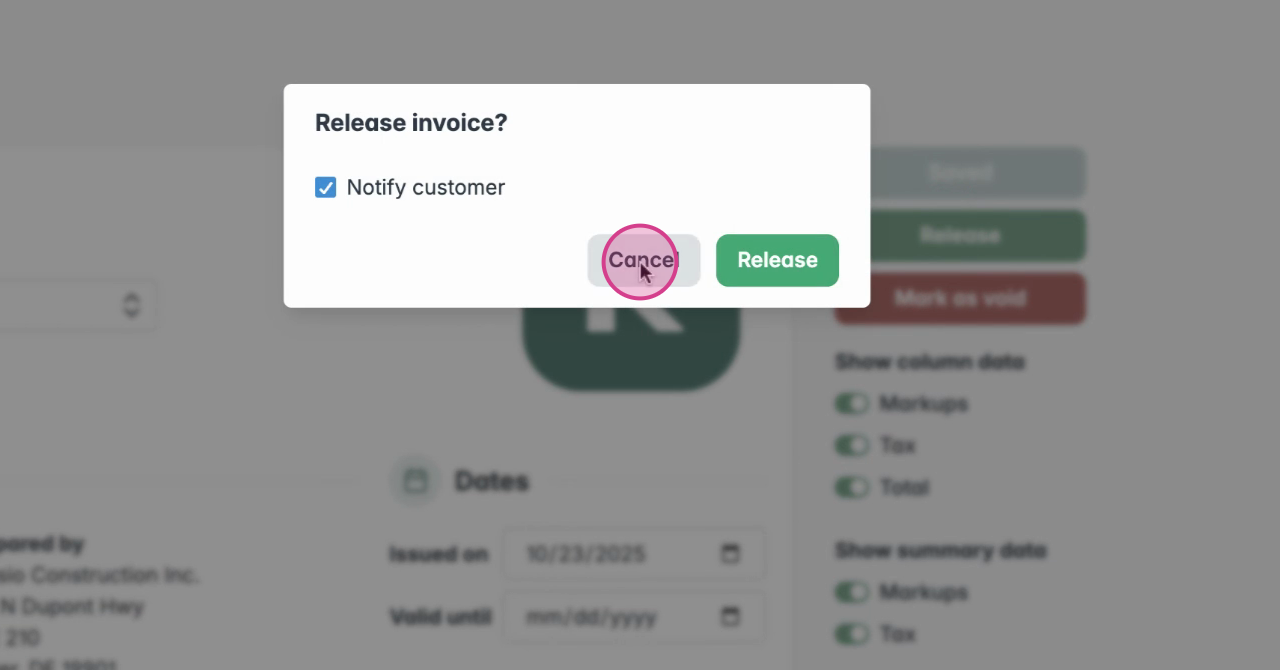
Before releasing the invoice to the customer, ensure all details are correct. You can modify the invoice number, name, add asset descriptions, terms and conditions, and attach files.
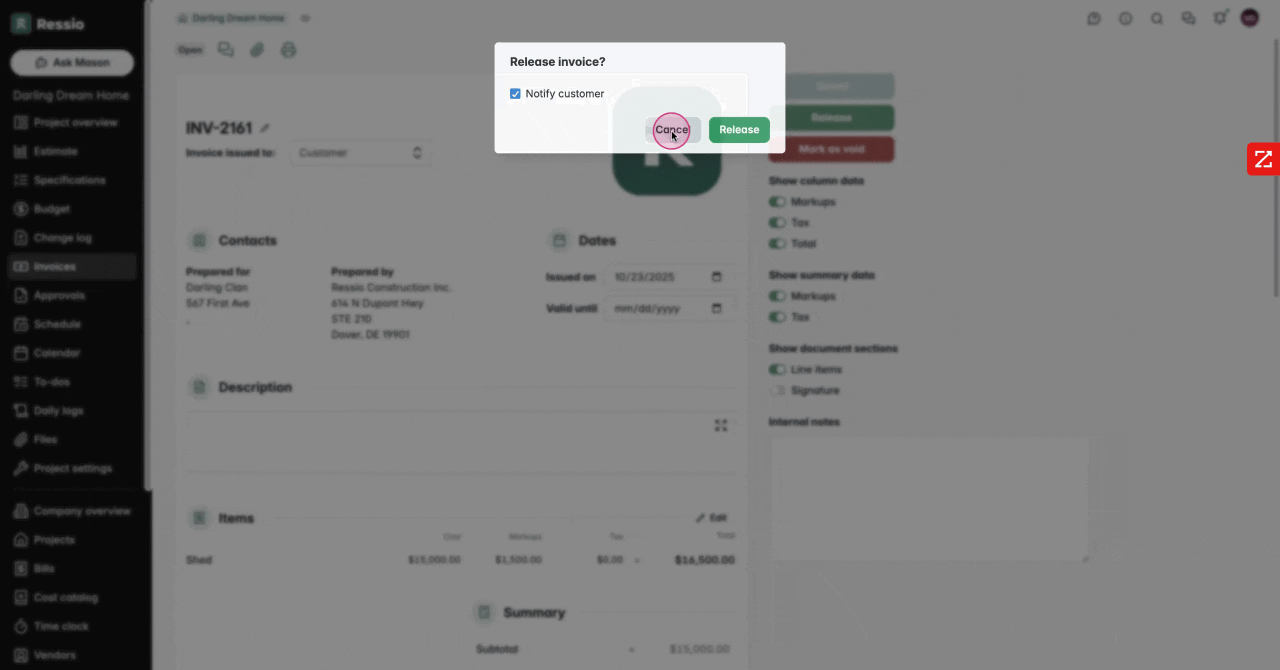
There is also a check box that appears asking if you would like to notify the customer. By default it is checked.
-
When ready, click Release in the top-right corner of the invoice.
-
Once released, the invoice appears in the customer’s portal under Budget → Invoices, and the customer will be notified.
🚨 Editing and Removing Sections can only happen when the invoice is in Draft or Open status. Once an invoice is pending or paid, sections and their items become locked.


Note: Ressio always requires at least one active section per invoice.
🎓 To learn more on what the client sees, read the Client Welcome Information.
🎓 To learn more about managing client visibility, make sure to read Managing Client Access.
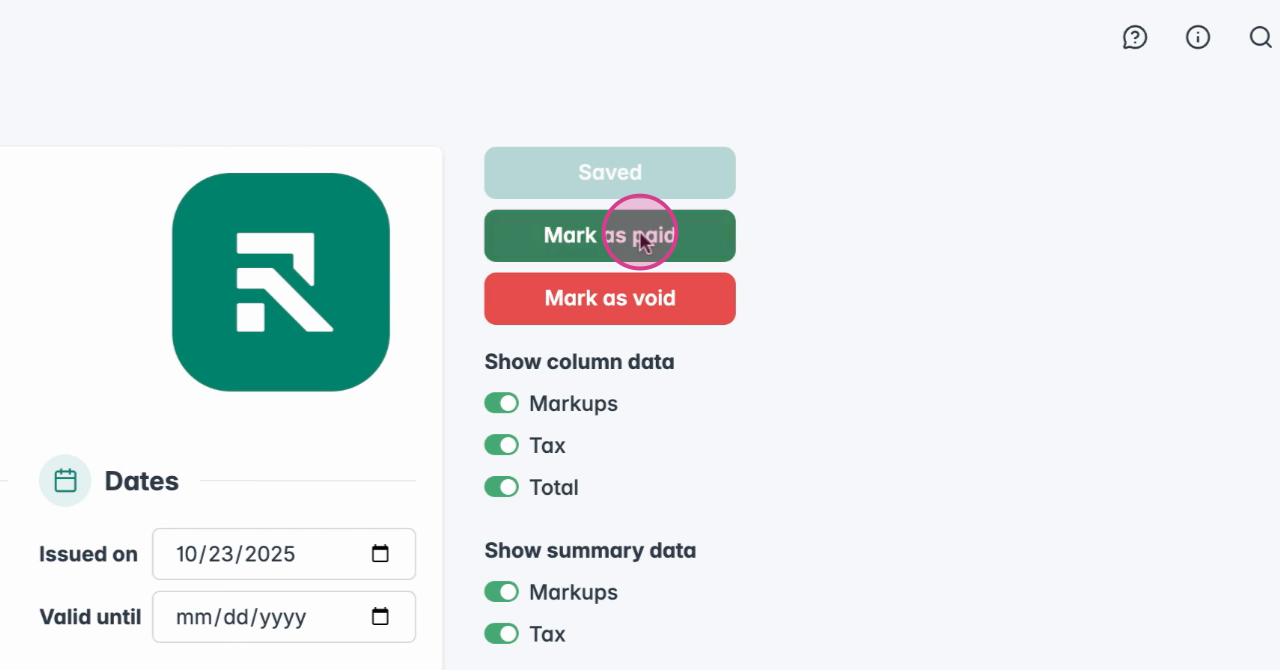
If you've made a mistake, you can void the invoice. To do this, select 'Mark as Void'. You can void an invoice at any stage.
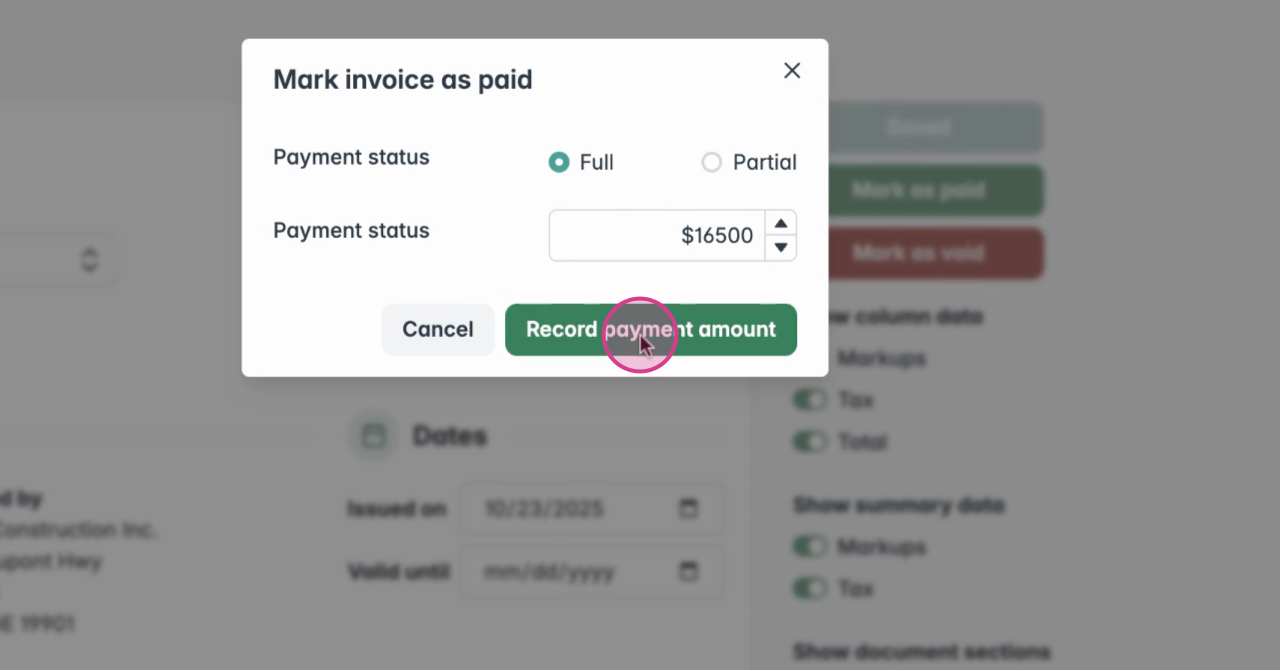
Track and Mark Payments
After the payment has been recorded you can view the status under the 'Invoices' page.
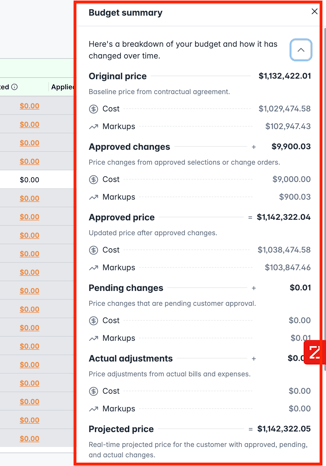
Finally, you can view a summary of the overall budget and the breakdown on the Budget page. This provides an overview of all changes that have been made over the course of the project.
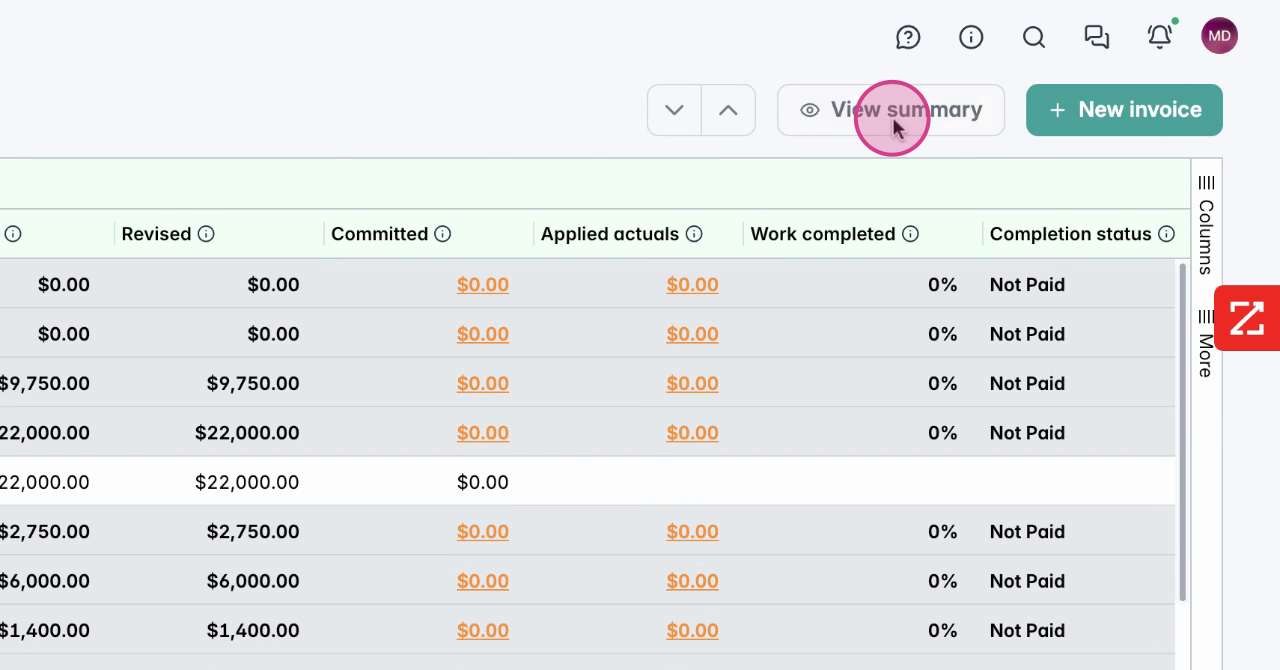

You can also expand the view to see a more detail breakdown.
🎥 To learn more about about enhancing and adding items to your invoice, watch Invoice Flexibility Overview.
If you still have unanswered questions or need further assistance, please don't hesitate to reach out to our dedicated support team at support@ressiosoftware.com. We're here to help!