.png?width=75&height=75&name=Untitled%20design%20(22).png)
Overview
Why this matters
Project Templates help your team:
-
Save time by starting with a fully built project instead of recreating the same structure manually.
- Create consistency across similar projects so your team follows the same process every time.
- Reduce missed steps by including standard schedules, to-dos, selections, files, and approvals from the beginning.
- Keep related items connected so schedule tasks, selections, and to-dos stay linked after the new project is created.
- Protect your original template because changes made to the new project do not affect the template it was copied from.
Table of Contents
What is a Project Template and Where to Find it
.png?width=670&height=198&name=download%20(53).png)
What comes over from a Project Template?
When you create a new project from a template, Ressio copies the reusable project information from the template into the new project.
For example, if your template does not include files, then no files will be copied into the new project.
What can be copied from a Project Template?
- Estimates
- Selections
- Selection choices
- Images connected to selections
- Schedules
- To-dos
- Bid requests
- Purchase orders
- Assigned vendors
- Line items and dollar values
- Files
- Project settings
- Vendor access settings
- Customer sharing settings
- Financial structure and project setup decisions
Before you create a project from a template
Before creating a new project from a template, make sure the template project is set up the way you want.
A good template should include the standard items your team wants to reuse, such as:
- A standard estimate structure
- Common selections and selection choices
- Standard selection images
- A baseline schedule
- To-do lists
- Punch lists
- Walkthrough checklists
- Bid requests
- Purchase orders
- Common vendors
- Standard files or documents
- Project access settings
- Customer sharing settings
- Vendor visibility settings
How to create a project from a template
-
Navigate to the All Projects page under Company overview.
-
In the top right hand corner, select to start a "+ New project".
.png?width=670&height=182&name=download%20(54).png)
-
You will see a new "Template" section at the top of the page. This is where you can decided if you will be creating a new template or a project.
.png?width=670&height=377&name=download%20(55).png)
*Note that it says under "Create from template" - "Selecting a template carries over project information including Estimates, Bids, POs, Schedule, To-dos, Files, and Project Settings. - Select a template from those in the "template stage". Only clean, standard templates appear, avoiding duplication of personal project data.
-
Review the project details that fill in automatically. Some information from the template may populate right away, such as:
- Square footage
- Descripition
- Project details
- Financial structure
- Other saved project settings
.png?width=389&height=395&name=download%20(57).png)
.png?width=436&height=439&name=download%20(58).png)
-
Enter or update the information that is specific to this new project. For example, you may need to enter:
- Project name
- Project address
- Customer
- Start date
- Stage
- Any project-specific detials.
- Click "Create from Template" once you have reviewed and added project details.
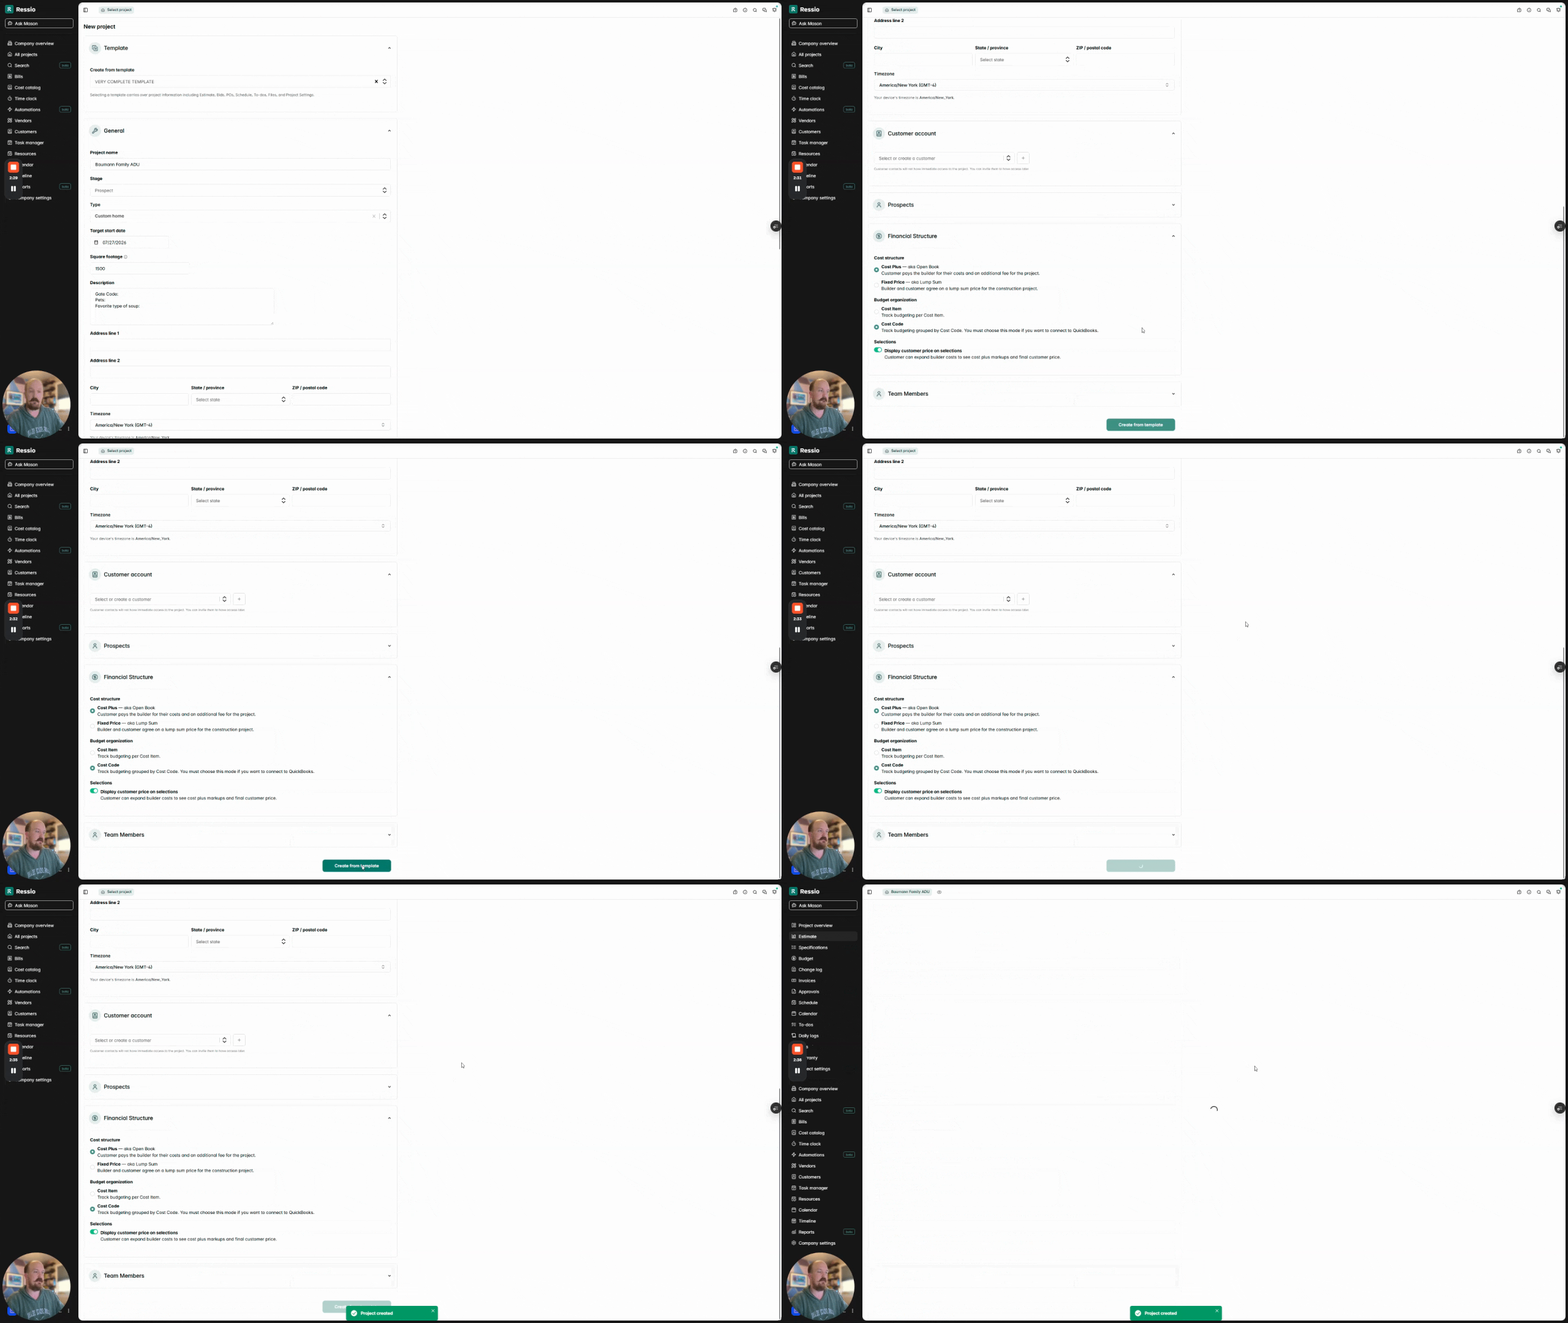
- Ressio creates the new project and opens it for you.
🤔 Once the project is created, you can open each area of the project and review what was copied over.
What you may still need to enter manually
- Project name
- Project address
- Customer
- Start date
- Project stage
- Job-specific scope details
- Pricing
- Customer-specific notes
- Vendor assingments
- Schedule dates
- Files that only apply to this project
For example, your template may include a standard financial structure, schedule, estimate, selections, and customer settings.
⚠️ However, you will still need to add details that are unique to the actual project, such as the customer and project address.
Reviewing your new project
After Ressio creates the projects, review each area befor using it with your team, customers, or vendors.
Review the estimate
Open the estimate and check:
-
Estimate structure
-
Line items
-
Pricing
-
Quantities
-
Selections
-
Selection choices
-
Selection images
If the estimate includes selections, confirm that the choices and images still make sense for the new project.
Review selections:
If your template includes selections, review:
-
Selection names
-
Selection choices
-
Due dates
-
Images
-
Related schedule tasks
This is helpful when your selections need due dates based on your project schedule.
Review the schedule
- Schedule phases
- Tasks
- Durations
- Start dates
- Due dates
- Related items
Review to-dos
- To-do lists
- Individual tasks
- Assigned users
- Due dates
- Related schedule tasks
- Standard punch lists
- Pre-construction checklists
- Walkthrough checklists
- Project setup tasks
- Closeout tasks
Open the approvals area and review:
- Bid requests
- Purchase orders
- Assigned vendors
- Line items
- Dollar values
- Scope details
Review files
Open the files section and review any files that came over from the template.
- Questionnaires
- Walkthrough guides
- Customer handouts
- Project setup documents
- Selection guides
- Internal checklists
- Vendor access
- Customer access
- Schedule visibility
- Customer sharing defaults
- Other project settings copied from the template
⚠️ Important: The new project does not change the original template.
- After you create a project from a template, the new project becomes its own separate project.
- You can edit the new project as much as needed without changing the original template.
- These changes only affect the new project.
- The original template stays clean and ready to use again.
Tips for success
-
Build your template intentionally - Your template should include the standard information your team wants to reuse. The better your template is, the faster and more consistent your new projects will be.
-
Keep template clean - Only use projects in the Template stage as reusable templates.
-
Avoid including customer-specific or job-specific details unless they are meant to be reused.
-
A clean template helps prevent unnecessary information from being copied into future projects.
-
-
Review before sending anything out - After creating a project from a template, review the copied information before sharing it with customers, vendors, or team members.
-
Update project-specific details right away.
-
Use templates to create company standards - Project Templates are a great way to standardize how your team starts each project.
Need help?
If you still have unanswered questions or need further assistance, please contact our support team at support@ressiosoftware.com.