Selections are often the most personalized choices & touches that a client will put into their build. The selection process within the Ressio platform is a simple & robust to ensure all types of selection decisions can be captured.
Table of contents
Overview Video
Starting a selection
To start a selection, navigate to the "Estimate" page and click the "New selection" icon next to to any cost item that you want to turn into a selections item.

The selections editor will load in the right-hand side drawer. To start building the selection enter or modify the requested data:
- Allowance
- Description
- Instructions
- Due date
- Display Mode
- Selection Type
Descriptions of the different selection types can be found on-screen in the selection editor.
Note: Selection type can be edited later if needed.

Display Mode
This feature controls how prices are shown to customers. You can configure selection choices in Ressio to clearly display pricing differences, so clients can easily understand the impact of their options.

There are two options:
- Full amount - show the full amount of each choice and the allowance
- Price difference - show the price difference in customer price between the selection and the original customer price

⚠️ Choosing "Price difference" will limit you to 'Single choice only' or 'Single choice with optional add-ons'. The other two options will be greyed out.
✅Use Price Difference mode when upgrades/downgrades matter more than full package cost! This allows you to show you customer the price of upgrading or choosing a less expensive option against the base allowance.

Add-ons
Include add-ons (e.g., optional features) to display their isolated price impact.

🎓 To learn more about the display mode and adding price difference watch THIS video and read THIS article for a deeper dive into display mode on selections.
When ready to continue building out the choices & choice groups of the selection, click "Create selection"

Creating choice groups
Choice groups allow selection choices to be grouped according to like properties. Some examples include:
- Grouping selections by a space or room
- Grouping selections by a selection type
In order to create a choice group, click the "Add another choice group" button. in the selection editor.

Once the choice group is created, name the choice group and select the option that best represents the desired client action when selecting a choice.

Creating selection choices
Selection choices are the options (or choices) you want to have the client make a decision on. In order to create a selection choice within a selection group, click the "+ Add a choice" button.

Enter the choice details & cost details in the pop up window.
Note: Multiple cost details can be supported if needed. Click the "+ Add cost detail" button to add additional cost details.

Once a selection choice is created, attachments (images or files) can be added to the selection choice by clicking on the "Add file" button and browsing your computer for the desired image or attachment.

Adding a Choice Using the Web Clipper
You can add a selection choice directly from a product page on a vendor or retailer website. Instead of typing in product details by hand, Ressio pulls the name, description, images, and pricing from the page for you.
Open the selections either through the Specifications page or the Estimate. Inside the choice group, click the "Add from URL" button. You will find it next to the "Insert from catalog".
Specifications page

Estimate page
- Click " 🔗 Add from URL".
- Copy the product page URL from your browser and past it into the field.
.png?width=288&height=175&name=download%20(27).png)
- Click "Import".
- Review the details that were pulled in. You can edit any field before adding the choice. Add files or any other information.
Ressio will automatically create the choice, fill in the product details, attach the product image as a thumbnail, and add the source URL as a link on the choice. A green "Choice added" confirmation will appear when it is done.
📽️ To learn more and watch a short video on adding a choice via URL, click HERE.
✅ This works best on individual product pages. Navigate directly to the specific product before copying the URL. Pricing may not always transfer depending on the retailer's website. If a field comes back empty, you can fill it in manually.
🗒️ Some retailer websites restrict outside access to their product data. If you get limited or no results, enter the choice details manually or try a different retailer site.
❓ Choice not opening after it was created? This can happen occasionally. Look for the green confirmation banner, your choice was still created. Find it in the choice list and click to open and edit it.
Inserting a Selection Through the Cost Catalog
You now have the ability to search and select a catalog cost item or cost group to create a new choice. After beginning the process of creating your first selection, when the drawer opens, there will be a "Insert from catalog" button.

When you click "Insert from catalog", a window will pop up and you can search, then insert.
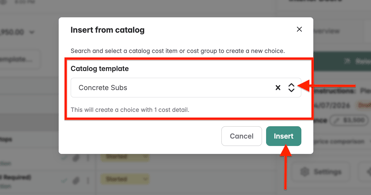
Hit "Insert" to finalize the cost item or group to become a choice.
Editing choice groups and/or selection choices
Editing choice groups or selection choices can be done clicking on the "More" icon on the selection group level or the selection choice level depending on which item you wish to change.

Releasing selections for client approval
When the selection is ready to be released, click the "Release" button, followed by the "Release" button to release the selection to the client.

🎓 For more information on what happens once the selection is released to a client, check out the knowledge base document for clients - Viewing & Approving a Selection [A Homeowners View].
Approving selections (alternate option)
If desired, a selection can be approved without sending the selection document for client approval. Instead of clicking "Release", click "Approve" and enter any notes that go along with this approval.
Note: All approvals (whether client approved, or contractor approved are viewable by clients & contractors. The "Approve" button should only be used in the event the client has already provided their selection choice/decision on the selection(s).
View an existing selection
All approval documents can be viewed in the "Approvals" page. To view a list of all the selections, click on the "Selections" tab. You can now see a list of all the selections and their current status.
Note: Budget impact from selections are captured in the selection document & in the "Budget" page. More information can be found on this in the "Actual vs Revised Budget" help document.
Display Customer Price for Allowance (Cost Plus Projects Only)
To enable the ability to display customer price for allowance on cost plus projects, your project will have to be set up for cost plus.
Navigate to your Projects Settings->Financials tab. If it is a cost plus project, you will have the option to toggle on "Display customer price on selections". It is located under 'Selections'

When enabled, customers will see clearer pricing details during the selections approval flow, including an easy before vs. after comparison and a clear statement of how much the selection increases the overall project price.
❓For FAQ on selections, read Selections FAQ.