Entering bills in Ressio gives you clear visibility into project expenses and keeps your budgets up to date. Bills can be created, tracked, and approved directly within your projects for streamlined financial management.
Benefits of Using Bills in Ressio
🔗 Cost tracking: Track bills against estimates and purchase orders
👀 Budget insight: Give your team visibility into payments and statuses.
📊 Automation: Update the budget automatically when bills are approved.
🔍 Bill management: Sort and filter bills for a more detailed view of expenses.
Table of contents
Navigation and Layout
The Bills page is accessible from the left-hand menu and shows bills across all projects.

Adjusting Columns: Sort, filter, or drag column headers to customize your view.
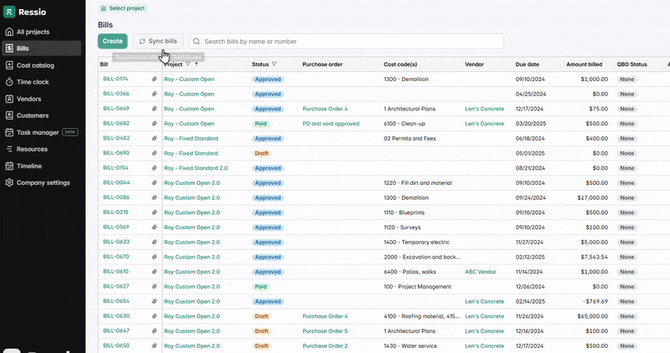
🔎 Tip: Use filters to view bills by Vendor, Project, or Status.
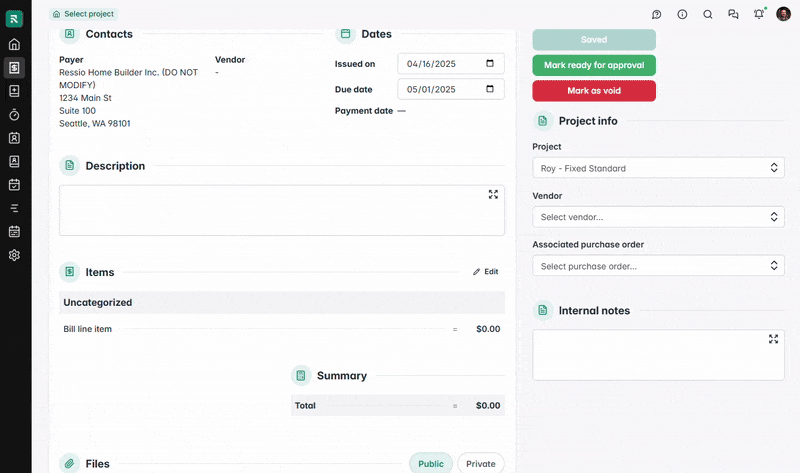
Bill Layout
Each bill can include:
-
Vendor and project details
-
Invoice numbers and descriptions
-
Cost breakdowns
-
Attached files (e.g. invoice PDFs)
To make edits, use the ✏️ icon, select from drop-downs, or click into fields.

Files: Upload invoice PDFs or related documents for team visibility. These can be shared on Invoices.
📎 Files can be added to a bill and the file will push to Quickbooks Online (QBO). QBO supports the following files:
application/pdf
image/jpeg
image/jpg
image/png
image/gif
image/tiff
text/csv
application/msword
application/vnd.openxmlformats-officedocument.wordprocessingml.document
application/vnd.ms-excel
application/vnd.openxmlformats-officedocument.spreadsheetml.sheet
text/plain
text/xml
text/rtf
application/postscript
application/vnd.oasis.opendocument.spreadsheet
Bill Name: We recommend editing bill name to match the invoice/receipt number.

⚠️ Limit: Bill names must be less than 21 characters.
Bill Information: The following fields are editable:
| Project name | *Required: Select corresponding project |
| Vendor | *Required: Select Vendor |
| Associated PO | Connect to a Purchase Order |
| Issued On date | Copy date from invoice/receipt |
| Due Date | Copy date from Invoice |
| Description | Describe cost or copy from invoice/receipt |
| Internal Notes | Enter private notes for team |
When choosing a vendor from the drop down menu on your bill, if a vendor has an expired COI or license, the badge "Expired" will appear next to that vendor's name.

This update improves visibility and ensures users can easily identify vendor status when managing bills.
Cost Items
Cost item information enables detailed cost tracking. This information feeds into the budget, and if integrated, to Quickbooks.
Select ✏️ Edit to enter:
Cost Name │ Cost code │ Unit type │ Quantity │ Unit cost
🧾 Multiple cost items: Select + Create line items to add additional cost lines.
Creating Bills
When an invoice from a vendor, or a paid receipt is received, enter it as a Bill. Bills can be created in three ways.
1. From the Bills Page
Select Create at the top to create a bill for any project.

📌 Tip: Start from the top. A project must be selected before costs can be added.
2. From the Budget
Use the Actuals column on a project's Budget page to create a bill for a specific cost code.
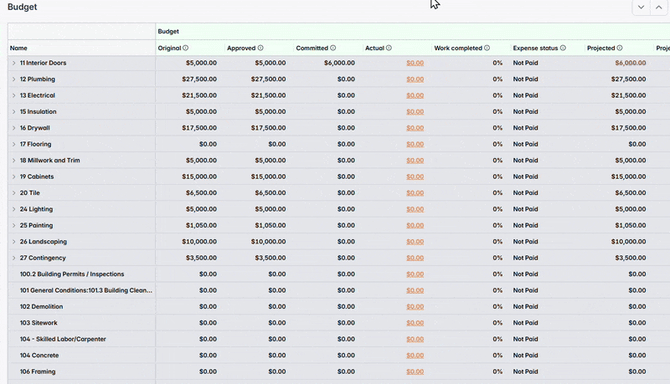
➕ Note: Add additional codes using + Create Line Item.
3. From a Purchase Order
Creating a bill from a PO will pre-fill most of the bill information. Edits to any field can still be made.

📚 See our article on Purchase Orders for more.
Approval Process
Update a bill's STATUS to control when bills are approved to be paid. Bills have four different statuses: Draft │ Ready to Approve │ Approved │ Paid
Draft
Once a vendor invoice or receipt is received, enter it as a bill to begin the process. Draft bills can be found on the Bills page, and in the Bill edit window of the budget.
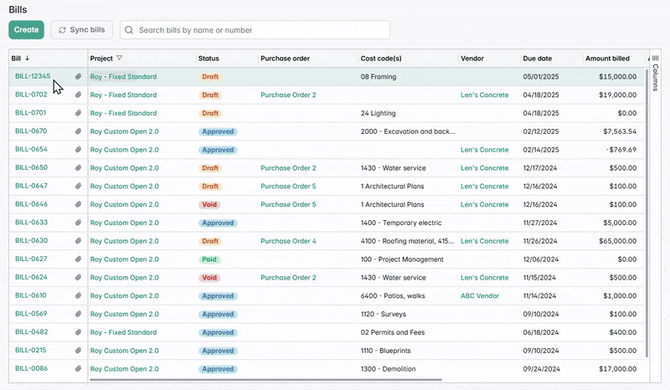
⚠️ Draft bills DO NOT affect the budget until they are approved.
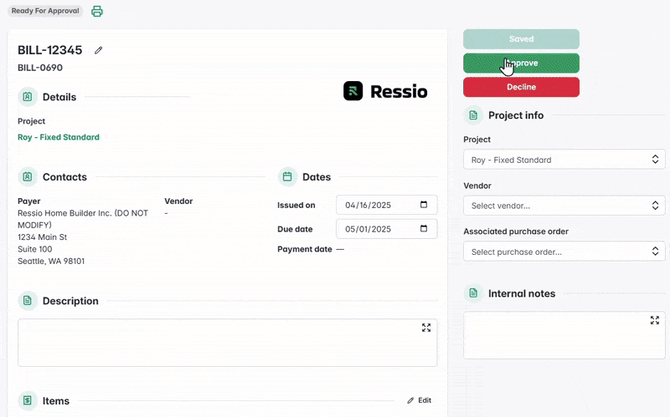
Ready to Approve
If the work is done or materials delivered, mark the bill ready to approve.
Select Mark ready for approval and enter an approval note to approve.

🔎 Tip: Easily approve multiple bills by filtering the Status column on the Bills page.
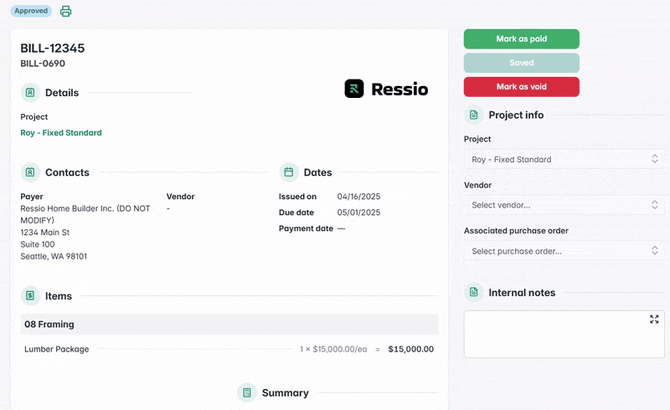
Approve
Approving a bill updates the Actuals in the budget.
Select Approve.
🔄 Quickbooks integration: If you have set up your project to push Bills into Quickbooks, Approving will sync the bill to QB.
Mark as Paid
Once paid, select Mark as Paid and enter the paid amount.
⚠️ Quickbooks integration: If a bill is pushed to Quickbooks, it must be marked as Paid there. The bill's status will be updated in the next sync.
If you have any questions or need further assistance, contact our support team at support@ressiosoftware.com. We're here to help!