Connect time clock entries to your Quickbooks Online account to push time clock data and pull labor costs into your budget.
Benefits of Time Clock Integration
⏱️ Save Time: Instantly sync time data to streamline your workflow.
✅ Enhance Accuracy: Eliminate transcription errors by automating the payroll process.
📈 Improved Budgeting: Accurately track labor costs across your projects
Table of Contents
- Matching Team Members to QuickBooks Employees
- Setting Rates for Team Members
- Permission Settings for Time Clock
- Pay Rates Terms in QuickBooks
- Enabling Quickbooks Time Tracking
- Pushing Time to Quickbooks
- Syncing Labor Costs into the Budget
- Troubleshooting
Matching Team Members to Quickbooks Employees
Before You Begin: Ensure you have connected your QuickBooks Online account to Ressio. If not, please refer to our guide on: Connecting your QuickBooks Online account to Ressio
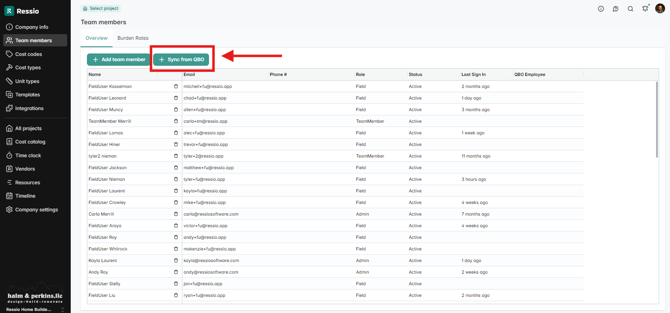
Once you are integrated, navigate to Company Settings - Team Members.
Select +Sync from QBO to provide access to your Quickbooks Employees.
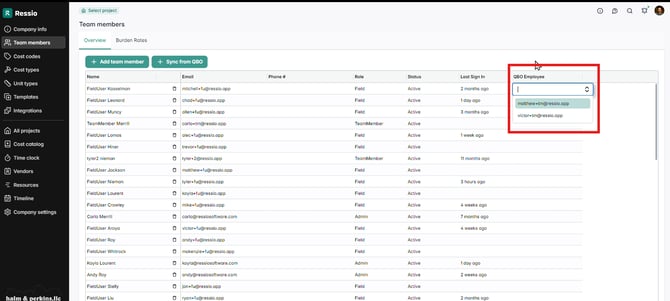
In the QBO Employee column, select the corresponding QuickBooks employee from the dropdown menu.
1099 Contractors: Only Quickbooks Employees can be matched. 1099 contractors are not eligible for integration.
Setting Rates for Team Members
💵Adding a rate to an employee allows Ressio to calculate labor costs.💵
- Fixed Price projects: Oftentimes burden rates (a combination of employee pay, insurance, social security, taxes) are used.
- Cost Plus contracts: Billable (charge out) rates are more common in open-book projects.
⚠️ Billable rates must be set in Ressio in order to push time to QuickBooks. If the rate in Ressio does not match the billable rate in QuickBooks, QuickBooks will take priority and override the rate coming from Ressio.
👀 Admins only: Billable rates are only visible to Admin users. 👀
To set an employee's rate, select the Billable Rates tab.
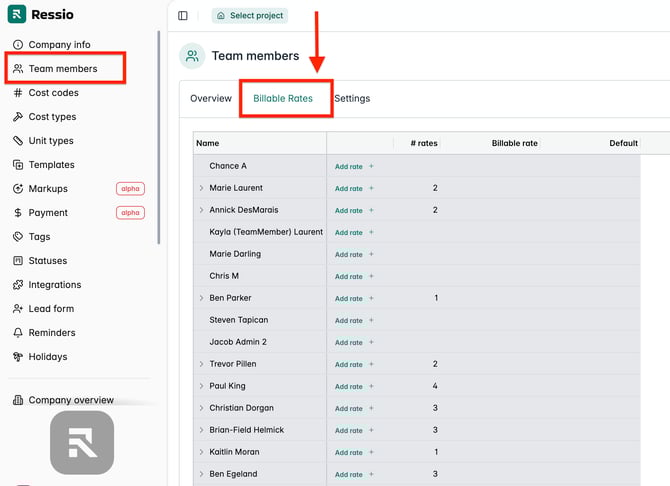
Select Add Rate + next to an employee name to add a billable rate. Double click into the cell to edit and set if Default rate if there is more than one.
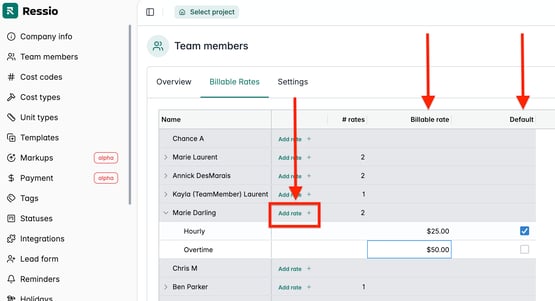
TIP: Employees can choose from multiple pay rates when they clock in. Add as many as needed and set their default rate by checking the Default checkbox on the right.
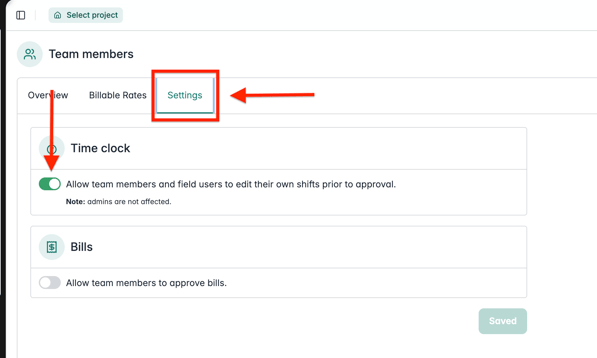
Permission Settings for Time Clock
You have the ability to allow Team Members and Field Users to edit their own time shifts prior to approval. To enable this go to the Settings tab next to the 'Billable Rates' tab.
Under 'Time Clock', toggle on to "Allow team members and field users to edit their own shifts prior to approval."
Pay Rate Terms in QuickBooks
When setting up employees or tracking labor in QuickBooks Online (QBO), you’ll encounter several pay rate types that serve different purposes for payroll, job costing, and client billing.
Pay Rate – The employee’s base wage (hourly or salary).
-
Found under Payroll Settings → Employee → Pay types. Used for payroll and tax reporting; excludes benefits or overhead.
Burden (Cost) Rate – The true cost of labor to your company, including taxes, insurance, and benefits.
-
Used for job costing. Set in the Cost Rate field under Time Activities or Projects. Internal only — not visible to clients.
Billable Rate – The rate you charge clients for labor, including markup for overhead and profit.
-
Found under Projects → Time Activities → Billable Rate. Used for T&M or Cost-Plus invoicing.
Ressio only pushes Billable rate into Quickbooks.
Connecting Time Clock to Quickbooks Online
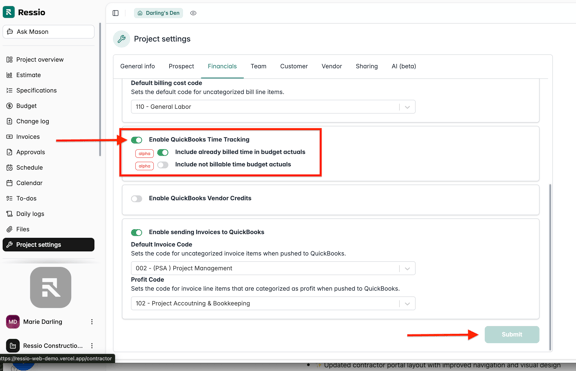
To sync labor costs into your budget, Quickbooks Time Tracking must be enabled for the project.
Note: Labor Costs entered directly into Quickbooks or from a 3rd party can be synced into your budget by activating this setting.👍
Go to Project Settings and select the Financials tab.
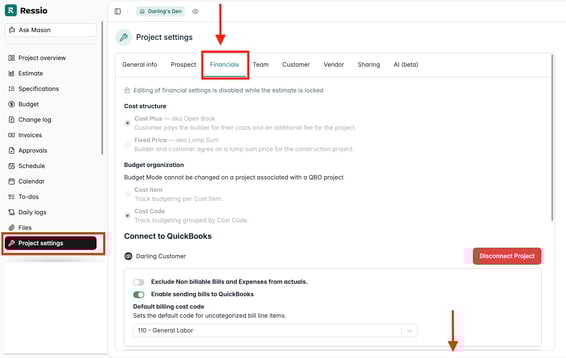
Scroll down and select the toggle to Enable Quickbooks Time Tracking.
Select Submit to save changes.
Pushing Time to Quickbooks Online
Before time entries can be pushed to QuickBooks, they must be APPROVED.
⚠️FINAL CHANCE: Once a time entry is approved it will automatically sync to Quickbooks and CANNOT be edited in Ressio. After approval, any changes must be made in Quickbooks. ⚠️
To approve time, go to Time Clock.

Select the green checkbox in the Actions column to approve the entry.

Because this action cannot be undone, there is one last chance to Confirm and approve.

Status: The Status column indicates if a time entry has not been reviewed (Draft), or if it was pushed to Quickbooks (Approved)
[back to top]
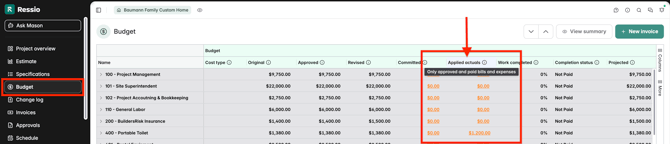
Syncing Labor Actuals into the Budget
Whether or not you've pushed time from Ressio or a 3rd party, labor costs from Quickbooks can now be synced into your budget.
Go to the Budget page in the left menu.
Select Sync Expenses as usual to pull in your actuals, now with labor cost included!
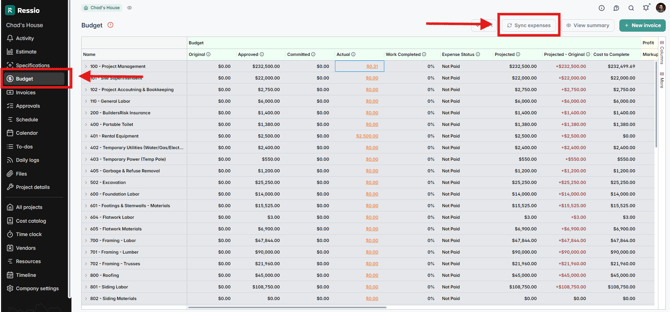
🎓 For more information about syncing actuals from Quickbooks Online, visit Syncing Budget Actuals from QBO.
Including Time Entry Cost in Budget Actuals
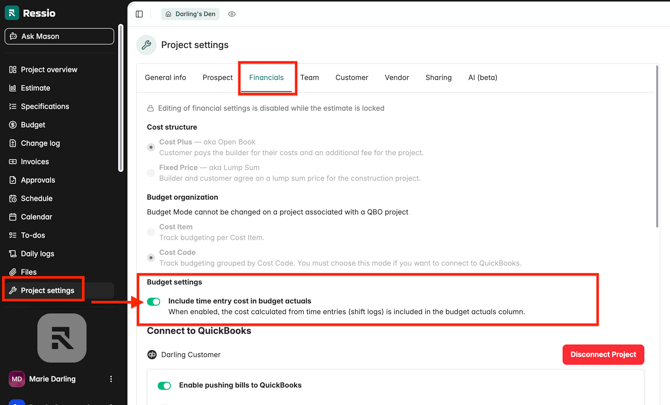
Time entries that are approved are now included in the budget actual calculations. By default, the toggle is ON to include time entry cost in budget actuals.
To turn it off, you must do it manually and toggling if off will exclude time entry costs from budget actual totals/views.
❗This new toggle applies to all TimeCharge costs (including shift-log/internal time entries), not only QBO-imported time.
🎓 To learn more about time entries on budget actuals, read "Tracking Labor Actuals in the Budget".
Troubleshooting
There are several connections required to make the time clock integration function correctly.
If you encounter issues with syncing or pushing time data, ensure the following settings are configured.
PROJECT ➡️ QB CUSTOMER: Verify that the project is linked to a customer in QuickBooks. Go to Project Details - Financials to confirm the connection.
TIME CLOCK ➡️ QB TIMESHEET: Ensure the QuickBooks Time Tracking toggle is enabled. Go to Project Details - Financials to confirm the toggle is active (green).
COST CODES ➡️ QB SERVICE CODES: Confirm the cost codes assigned to the time entry are connected to QB Service Codes. Go to Company Settings - Cost Codes and review the QBO column. To sync to QB, a cost code needs a corresponding QB Service code.
TEAM MEMBER ➡️ QB EMPLOYEE: Make sure each team member is associated with a QuickBooks employee. Go to Company Settings - Team Members to ensure the QBO Employee column is populated with a corresponding employee.
If these settings appear to be correct, and you are still having difficulty, please contact support@ressiosoftware.com.