Projects are dynamic activities and often times project settings need to be changed. The project settings page has eight tabs: General Info, Prospect, Financials, Team, Customer, Vendor, Sharing, and AI (Beta). Lets take a look at them!
Table of Contents

General Info
The General Info tab allows you to input and manage key information about the project. Here's what's included:
- Cover Photo – Displayed on the client’s homepage and in the client portal.
- Project Name – Internal label for the job; used in project lists.
- Project Stage – Choose from Prospect, Pre-Construction, Production, Warranty and Template. Used for sorting and filtering in project reports.
- Project Type – Options include Custom Home, Remodel, Commercial, Addition, Kitchen, Home Care, and more.
- Address – Used for documentation and to pull weather for daily logs.

- Time Zone – Can be searched and assigned based on geography.
- Description – Optional field for job details; expandable editor available.
- Target Start Date – Controls the earliest allowable task in the schedule.
- Square Footage – Used for cost-per-square-foot calculations.
- Project Color – Applies color coding to the resource schedule (not the main schedule).
- Archive Button – Used to archive projects; archived jobs do not appear in reporting for active or pre-construction phases.

Tip: Click Submit at the bottom of the page to save any changes.
[back-to-top]
Prospect
The Prospect tab is designed for managing sales lead information related to the project:
- Prospect Status – Track where the project is in the sales process (e.g., New Lead, Qualified, Proposal Sent, Won, Lost).
- Priority – Helps categorize urgency or level of interest.
- Creation Date – Auto-recorded when the project is added.
- Deal Close Date – Update this field when a project is won or lost.
- Prospect Owner – Assigns the lead to a team member.
- Lead Source – Tracks marketing attribution (e.g., website, radio, referral).
- Win Probability – Estimate how likely the job is to close.
- Budget Range – Capture both low and high budget estimates.
- Prospect Notes – Field for any other relevant sales info.
For contact information, refer to the Customer tab or read 'Adding and Managing Customers'.

Financials
In the Financials tab, users define how financial data is organized and billed:
- Cost Structure
- Cost Plus/Open Book/Time & Materials – Based on actuals and expenses.
- Fixed Price (Lump Sum) – Based on estimates and change orders.
-
Budget Organization
-
By Cost Item – Tracks spending at item level.
-
By Cost Code (Recommended) – Groups expenses under codes (e.g., all framing lumber as one cost code).
-
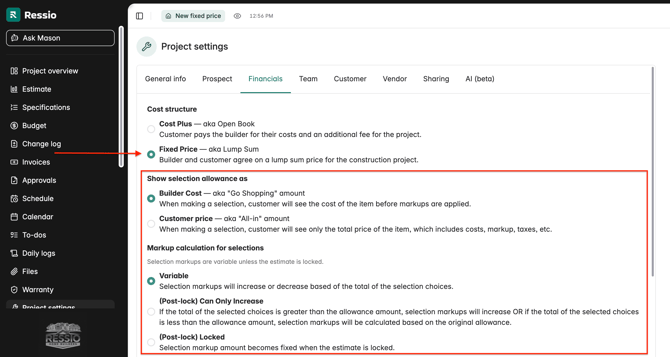
- Selections
- Fixed Price - Builder Cost - aka "Go Shopping" amount. When making a selection, customers will see the cost of the tiem before markups are applied.
-
Fixed Price - Customer price - aka "All-in" amount. When making a selection, customer will see only the total price of the item, which includes costs, markup, taxes, etc.
- Fixed Price - Markup calculations for selections (Selection markups are variable unless the estimate is locked.
- Variable - Selection markups will increase or decrease based off the total of the selection choices.
- (Post-lock) Can Only Increase - If the total of the selected choice is great than the allowance amount, selection markups will increase OR if the total of the selected choices is less than the allowance, selection markups will be calculated based on the original allowance.
- (Post-lock) Locked - Selection markup amount becomes fixed when the estimate in locked.
-
-
Cost Plus - Display customer price on selections - Customer can expand builder costs to see cost plus markups and final customer price.
-
Customers will see clearer pricing details during the selections approval flow, including an easy before vs. after comparison and a clear statement of how much the selection increases the overall project price.
-

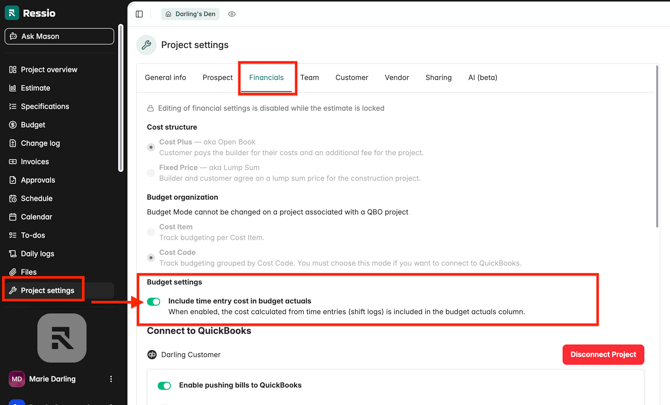
- Budget Settings
- Include time entry cost in budget actuals - When enabled, the cost calculated from time entries (shift logs) is included in the budget actuals column
✏️ By default, the toggle for "Include time entry cost in budget actuals" will be ON. If you do NOT want to include time entry cost in budget actuals, you will have to toggle if off in your project settings for each project.
- QuickBooks Integration – Link to a corresponding QuickBooks project via dropdown.
🎓 To learn more about cost structure, read Understanding Fixed Price vs. Cost Plus Contracts.
Team
- Team Members - Add internal team members to the project.
- Use the Edit button to assign team members such as Project Managers, Coordinators, etc.


- To learn more about how to add team members & clients to projects, check out our additional knowledge documents: "Adding & removing team members on projects"
Customer
- Assign customers and manage what they can view: Blue
- Overview - View project overview
- Schedule Settings – Show assigned phases only, all phases, or Gantt chart.
- Specifications – Allow customers to view the full spec list.
- Budget View Options – Enable visibility into budget summary, cost breakdown, and actuals (bills, amounts, vendors, issue dates).
- Change Log – Share history of project changes with the client.
- Approvals - View draft selections
- Add/remove customers and secondary contacts. Yellow
- View customer login history.


- More on Adding Clients - For more on adding clients please review: "Adding clients to a project".
- Client Experience - Details on desired client experience and visibility of items can be found in: "Previewing the client portal".
- Customer Visibility - For more information on the difference between Fixed Price vs. cost plus projects read "Understanding Fixed Priced vs. Cost Plush projects".
Vendor
- Settings - Toggle on what your vendors can view
- Schedule - Vendors can view all schedule tasks in a gantt chart
- Specifications - If desired, specifications can be shared with vendors. If toggled on, you have additional control to share all specifications or only specifications that the vendor is assigned to.
- + Assign - Assign vendors to the project.
- Vendor Options
- View vendor contact information or unassign vendors as needed.
- Notify vendors about assignments.
- Unassign Vendors from Project

- For step-by-step instructions to add a vendor in your contacts, see: How to add your vendors
Sharing
The Sharing tab enables access to the Plan Hub:
- Enable Plan Hub – Allows anyone with the link to view files in the plan hub.
- View Plan Hub – Review files attached to the current project.
- Generate QR code – Click 'Get QR code' to generate QR code to print and post on the job site.
- Copy Link – Shareable link for vendors or clients to access the Plan Hub.
🎓 To learn more about sharing the plan hub, read Plan Hub and Generating a Plan Hub QR Code for a Project.

AI (Beta)
The AI Tab lets you customize templates for AI-generated summaries:
- Edit the layout of AI-generated daily log summaries.
- Rearrange fields (e.g., move Additional Notes to the top).
- The AI Assistant will follow the configured layout when summarizing.

If you still have unanswered questions or need further assistance, please don't hesitate to reach out to our dedicated support team at support@ressiosoftware.com. We're here to help!